

The first step to making a caterpillar was sewing the individual "circles" that form his body. I didn't need a sketch since I already had an old drawing from years ago of my favorite caterpillar design. I cut the circles from fraying muslin, then sewed, turned, and stuffed -- sizes vary a little, since I wanted the caterpillar to sort of "build smaller" towards the head.

Heavy craft wire, looped on the ends, threaded through each circle, with the ends sewn inside the ends of his body. This made the caterpillar flexible and easier to pose. He needed six arms and six legs, of course, so the same wire was threaded through each circle's side, then curled and posed with a pair of pliers (his feet are wrapped in gold metallic thread to create his little curly-toed slippers).

A coat of cark blue paint, watered down, then sanding and primming. It's not a particular shade, since I combined several old bottles of dark blue, along with a little water, in order to make this dye. His face is left blank, except for the curve of his hood, so I can paint it white and needlesculpt it. The green and gold circles on his back were painted with a toothpick for small detail, along with the little red dot.

I tore up half of the travel section to create strips for the mushroom top. I layered the newspaper and glue over a frame of wire, and painted it red and white after it dried. I drilled a hole through an old dowel piece to create the stump (it's fastened to the mushroom top and the base with wire). The top isn't smooth, since I didn't apply a layer of tissue paper over the newspaper, but the paint gives it a softer texture. The same paper-mache is wrapped around wire to create the hookah pipe stem (the base is vintage beads).

Last, but not least, I trimmed the top of his head with fuzzy pipe cleaner dyed blue. It's a vintage package I found in some craft supplies around back. A few twists of the pliers, a few loops of gold thead and voila -- antennae!

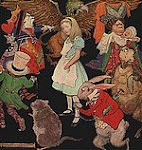
The finished product is curled on his mushroom, taking a few whiffs of smoke as he considers Alice's problem......


4 comments:
aThis is darling! What a perfect ending to the Alice series.
might i suggest instead of using paint the use of fabric/yarn dyes? they may be less toxic and also less prone to fading from ultraviolet lights.
The acryllic paints we use have little or no toxicity, so they're fairly safe. The "faded" look is very much a part of the primitive world, so we actually encourage our products to seem lighter in color (using sanding, watery dyes, tea, cinnamon, etc., to create an aged effect). But thanks for the tip! -- Eliza
To follow Liz and C.C.'s comments above, the metallic and enamel versions of acrylic paints contain toxic materials -- more than regular, mostly harmless acrylics...a lot of crafters use kool-aid as a cheap and safe yarn dye (Prim Mart's forums have lots of helpful hints for dying, painting, and other crafts).
Post a Comment